Help center - Working with LMS
Kids Academy website (LMS)
For district administrators
Share articleImport feature allows you to automatically add large amounts of data (e.g. information about students, teachers, school) to your Kids Academy account. Please note that you have to be either School or District Administrator to be able to use that feature.
In the School section of your Kids Academy account follow these steps:
1. Go into Upload Data section.
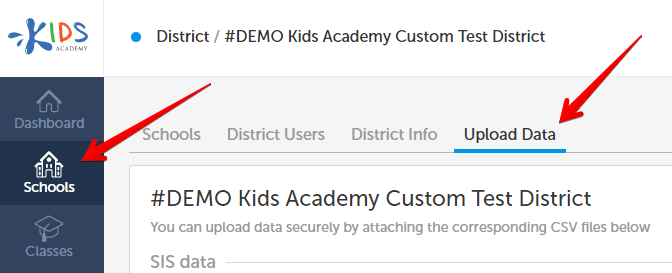
2. You will see 5 sections there:

District Admin CSV - allows you to add District Administrators.
Schools CSV - allows you to add Schools under your district account.
School Admin CSV - allows you to add School Administrators.
Students CSV - allows you to add Students to schools in your district.
Teachers CSV - allows you to add Teachers to schools in your districts.
Upload your School CSV first since it’s used for further data mapping, such as associating students and teachers with schools.
3. Wait until the upload is complete:

Once done, the text underlined with red would change to your last upload date.
4. Repeat steps 2 and 3 for all other sections.
Note: you may upload multiple CSV’s at once as long as Schools CSV is among them.
For school administrators
Share articleImport feature allows you to automatically add large amounts of data (e.g. information about students, teachers, school) to your Kids Academy account. Please note that you have to be either School or District Administrator to be able to use that feature.
In the School section follow these steps:
1. Go into Upload Data section.
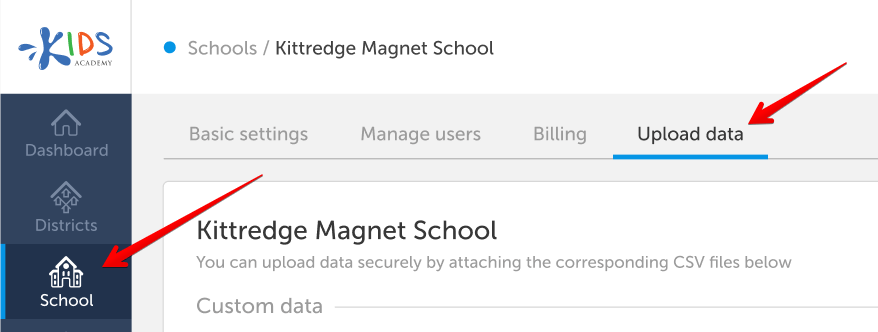
2. You will see 2 sections there:
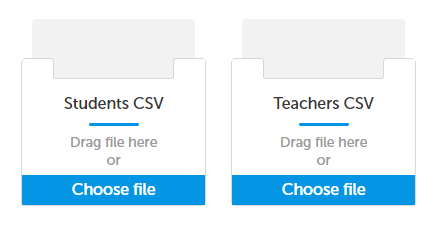
Students CSV - allows you to add Students.
Teachers CSV - allows you to add Teachers.
Upload your CSV’s to corresponding sections by pressing Choose File.
3. Wait until the upload is complete:

Once done, the text underlined with red would change to your last upload date.
Formatting your CSV
Share articleIt’s very important that your CSV is formatted correctly and adheres to these technical requirements:
Format: .csv only.
Size: up to 5 MB.
You can format your CSV as an Excel Table or as a text document. In case of the latter the entries should be divided by commas only.
District Admin CSV file example
This file has to contain the following entries:
- staff_id - user’s unique identification number
- admin_email
- first_name
- last_name
This file has to contain the following entries:
- school_id - school unique identification number
- school_name
School Admins CSV file example
This file has to contain the following entries:
- school_id - school unique identification number
- staff_id - user’s unique identification number
- admin_email
- first_name
- last_name
This file has to contain the following entries:
- school_id - school unique identification number
- teacher_id - teacher’s unique identification number
- teacher_email
- first_name
- last_name
This file has to contain the following entries:
- school_id - school unique identification number
- student_id - student’s unique identification number
- grade
- first_name
- last_name
- parent_email (might be empty)
Note: all the unique identification numbers (ID’s) can be taken from your local SIS. Should you require assistance with formatting your CSV please contact our Support team.
Errors
Share articleSometimes after importing your data you may see that some errors have occurred:

This may happen due to various reasons, for instance, if your students are higher than Grade 3. Please note that not all errors are crucial and you can always see where exactly they have occurred by pressing See Details next to the number of errors:
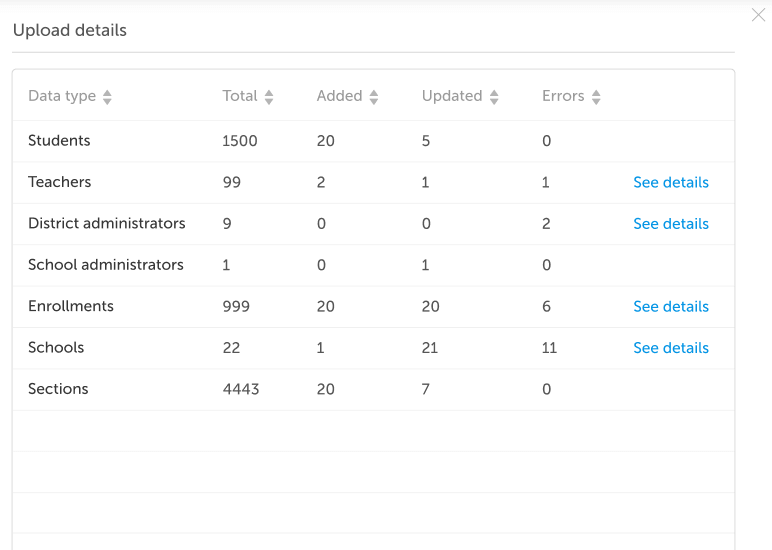
Pressing See details next to the section name would allow you to check which exact errors have occurred:
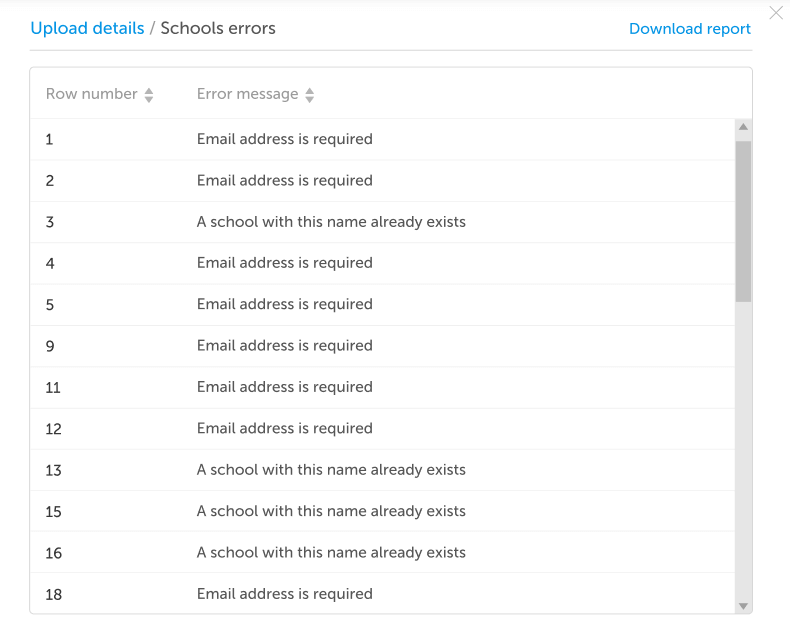
Pressing Download report will comprise that data into a text file that you may then share with your IT Department or send to Kids Academy Support (if required).
Kids Academy Reports section overview
Share articleThe Reports section gives you stats and insights into your students’ performance. You can analyze the data on two major levels: Class or individual Student. You will see the following metrics across the reports:
Time spent - how much time was spent on a class, lesson or activity by the student(s).
Completion rate - how far the student(s) have progressed on a scale from 0 to 100%.
Average score - the average score student(s) have achieved across all activities completed within the breakdown you’re viewing.
Average score for assessment - the average score the student has been awarded for all assessments within one or more curricula (depending on where you’re viewing it).
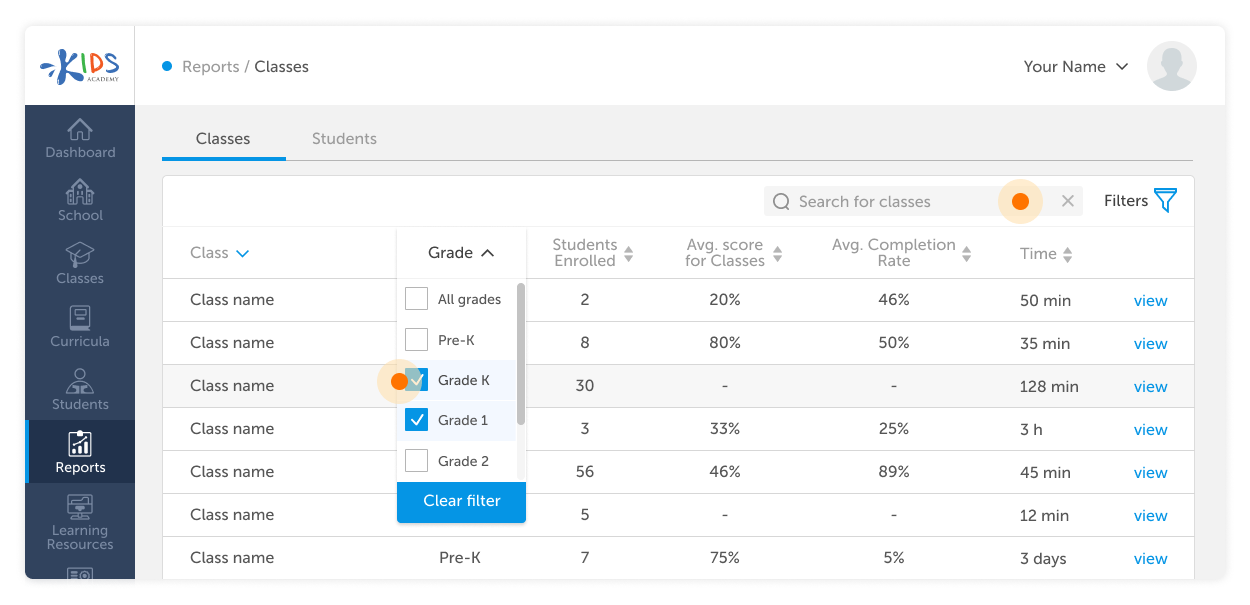
In the Classes tab, you can see aggregated stats for all the students in a class - the average score, the average completion rate and the time spent on activities. You can sort reports by grades and search for classes.
In the Students tab, you can analyze the performance of individual students.
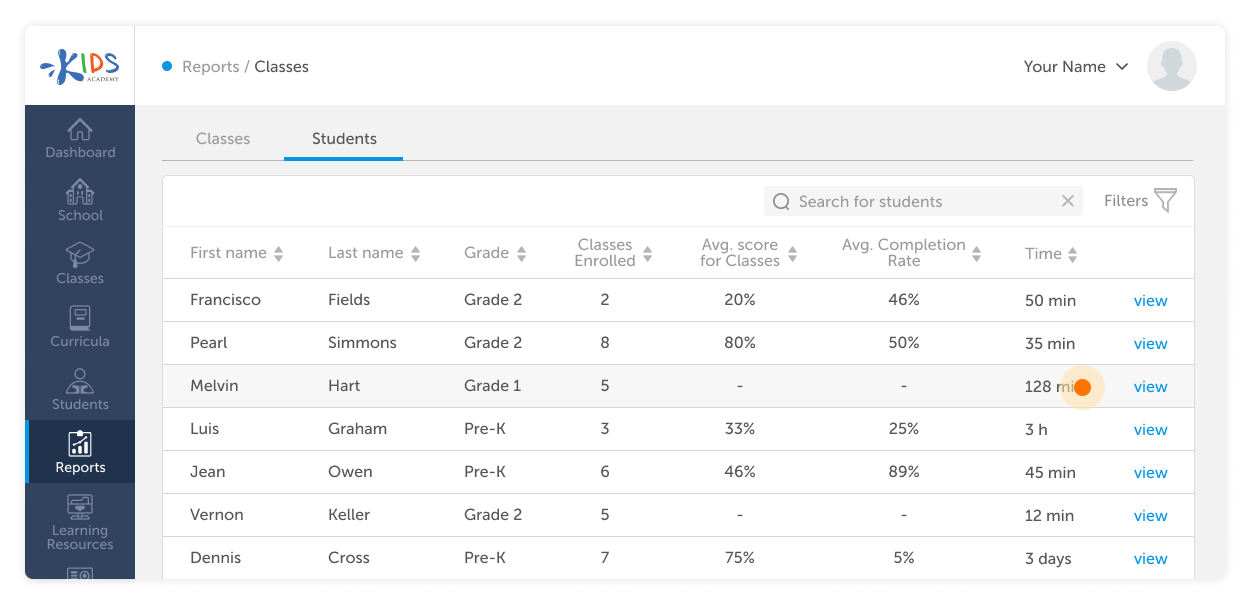
If you click View next to a student name, you will see a more detailed breakdown of their progress over time.
Making sense of Classes report
Share articleIn the Reports section follow these steps:
Click View next to a class to look through the report for it.
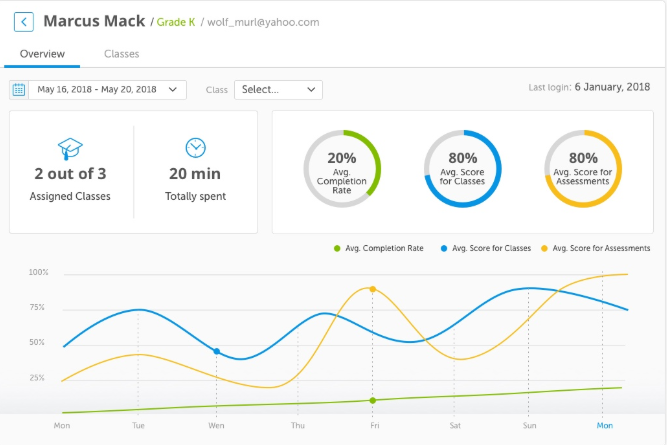
In the Overview tab, you can see diagrams presenting the average completion rate, the average score and the average score for assessments. Use the calendar to gather information for a certain period. You can also use the filter to see reports for certain grades.
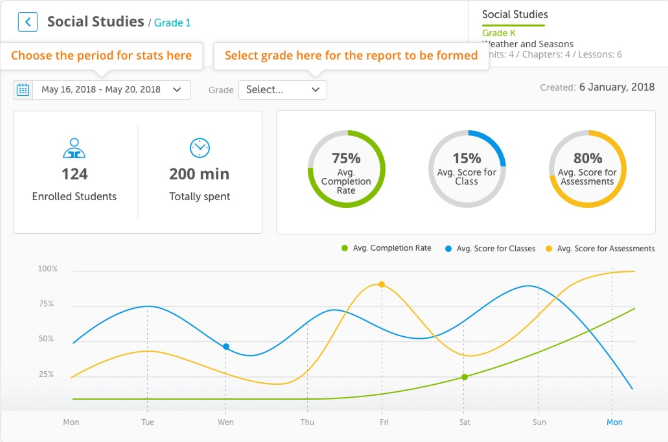
Time spent - how much time has been cumulatively spent by students on activities in this class.
Completion rate - how far the students have progressed on a scale from 0 to 100%.
Average score for class - the average score your students have achieved across all the activities they completed in this class.
Average score for assessment - average score the students have been awarded for all assessments in the class.
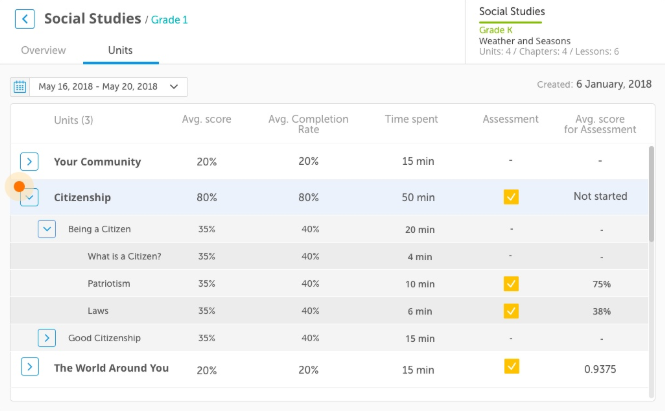
In the Units tab, you can see data structured in accordance with the curriculum for the class.
Click the 
Making sense of Students report
Share articleIn the Reports section follow these steps:
1 Go to the Students tab.
2 Click View to look through the report for the chosen student.
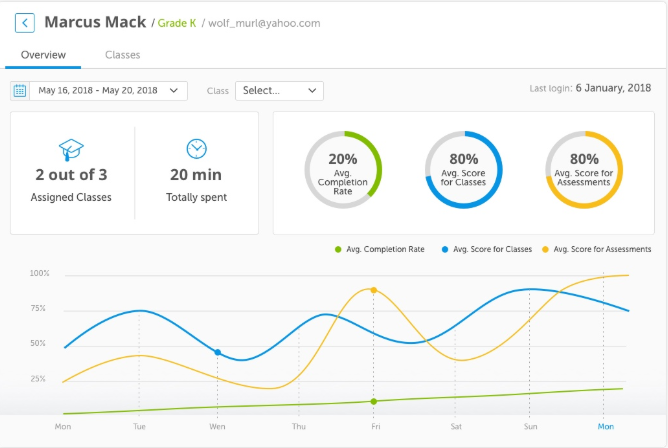
In the Overview tab, you see diagrams of assigned classes, total time spent, the average completion rate, the student’s average score for classes and assessments. You can also choose the period for which you want to see the statistics using the calendar and sort data by classes.
Time spent - how much time the student has spent on activities in the class(es) selected by the report filter.
Completion rate - how far the student has progressed on a scale from 0 to 100%.
Average score for class - the average score your students have achieved across all the completed activities.
Average score for assessment - average score the student has been awarded for all assessments in the selected class(es).
In the Classes tab, you see the classes the student attends and curriculum assigned to these classes.
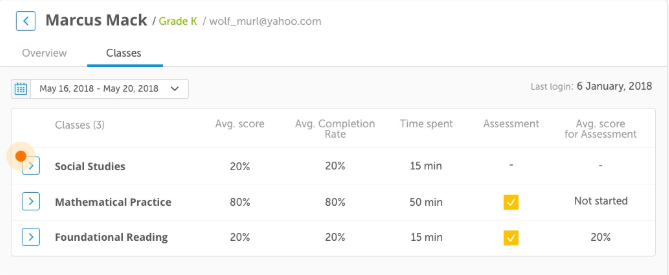
The data are structured in accordance with the assigned curriculum. Click the icon to check the statistics in detail from unit to lesson: the average score, the average completion rate, time spent, the assessment and the average score for the assessment.
How to create a new curriculum
Share articleYou can create your own curricula from scratch using the library of over 4,000 expertly designed learning activities.
In the Curricula section follow these steps:
1 Click +Add a New Curriculum.

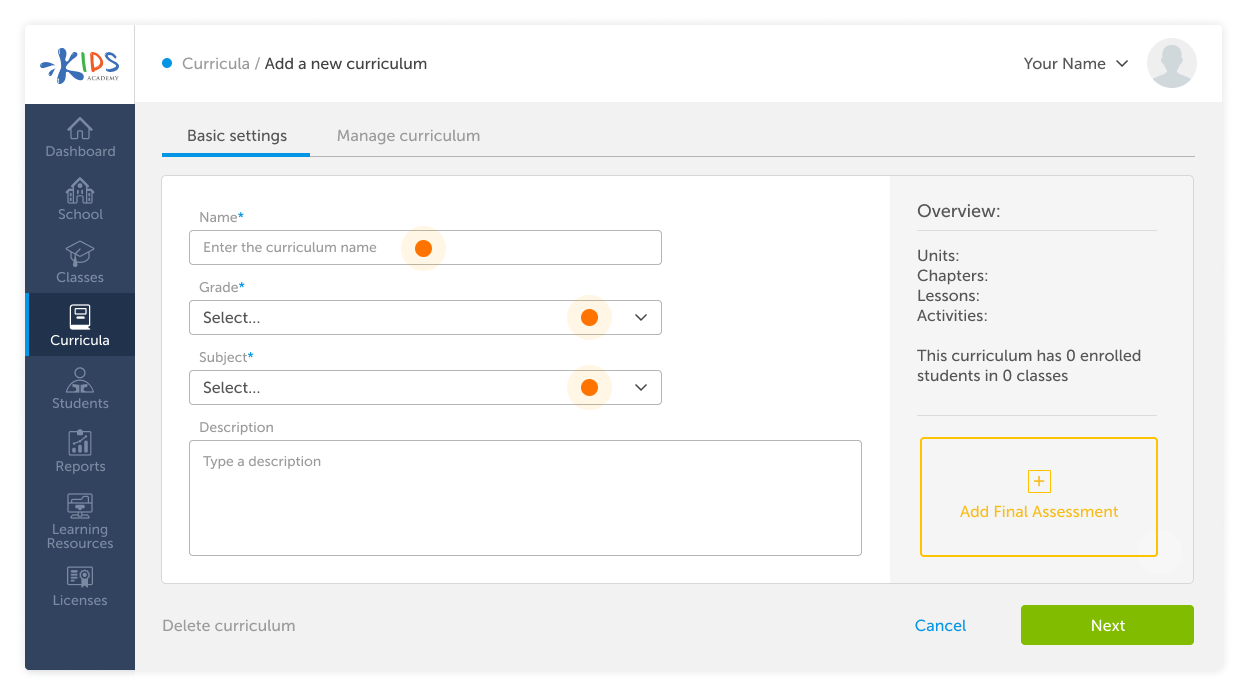
2 In Basic Settings, enter the name, select a grade and a subject. You can also add an optional description (the description is for your reference only and will not be visible to the students in the app).
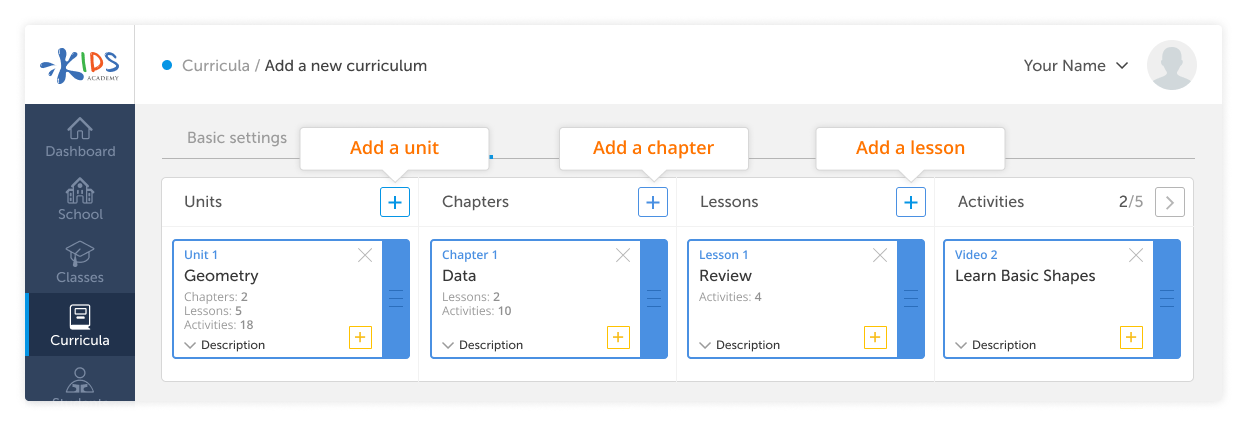
3 Go to the Manage curriculum tab.
* Click 
* Click 
* Click 
* Click 
Note: To make it easier for you to find the activities you want to use in your curriculum you can add them to Favorites first. (See ‘How to add activities to Favorites’).
Add a unit, chapter, lesson or activity to the curriculum
Share articleIn the Curricula section follow these steps:
1 Click on a curriculum you wish to edit.
2 Go to the Manage Curriculum tab.
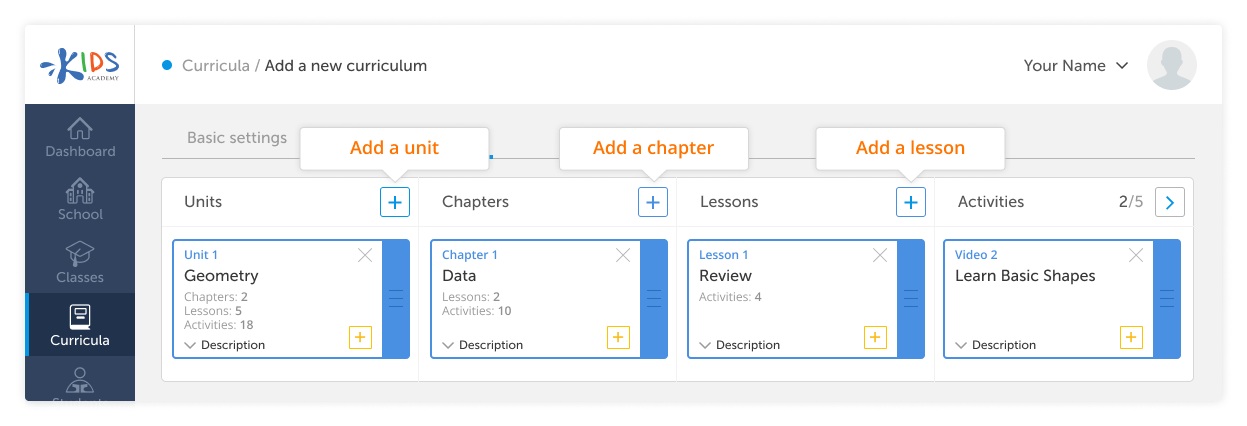
3 To add a Unit, Chapter or Lesson or Activity click on
the 
4 Enter the name and the description of the unit and click Save.
Note: To make it easier for you to find the activities you want to use in your curriculum you can add them to Favorites first. (See ‘How to add activities to Favorites’).
How to edit a curriculum
Share articleIn the Curricula section, tap on the icon of the curriculum, you wish to edit.
1 Change the Basic info: curriculum name, grade, subjects, and description if necessary.
2 Go to the Manage curriculum tab. The learning plan is fully editable i.e. you can add, edit or delete units, chapters, lessons, activities, and assessment or rearrange them.
In the screenshot below, you can see the main controls of the curriculum that allow you to customize your learning plan:
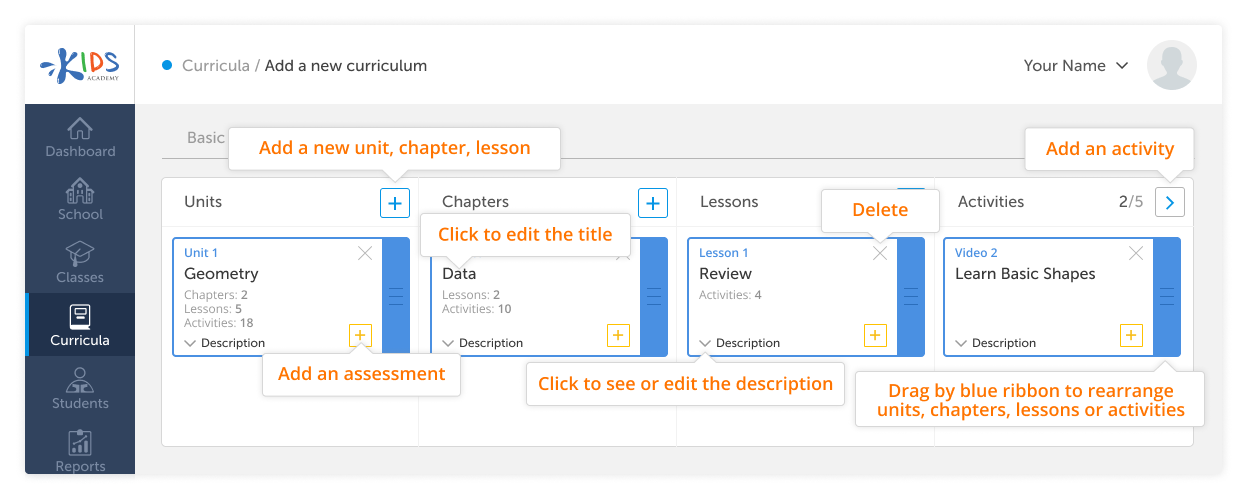
You can add and remove units, chapters, lessons, and activities, rearrange them any way you like as well as add assessments at any stage of the learning plan.
Note: The changes you make to the curriculum will apply to all the classes using it.
Add, edit, delete an assessment in the Curricula section
Share articleAssessment is a series of worksheets used to check how well students understood a topic or mastered a skill. You can add assessments while managing the curriculum to monitor students’ progress. You can add an assessment at any level of the curriculum: after any unit, chapter, lesson or even individual activity. There is also a final assessment of the whole curriculum.
How to add an assessment
In the Curricula section follow these steps:
1 Choose a curriculum from the list.
2 Go to the Manage Curriculum tab and choose the unit, chapter or lesson you want to be assessed.
3 Click the 
4 Click Assign to appoint the activity for the assessment. Click Save.
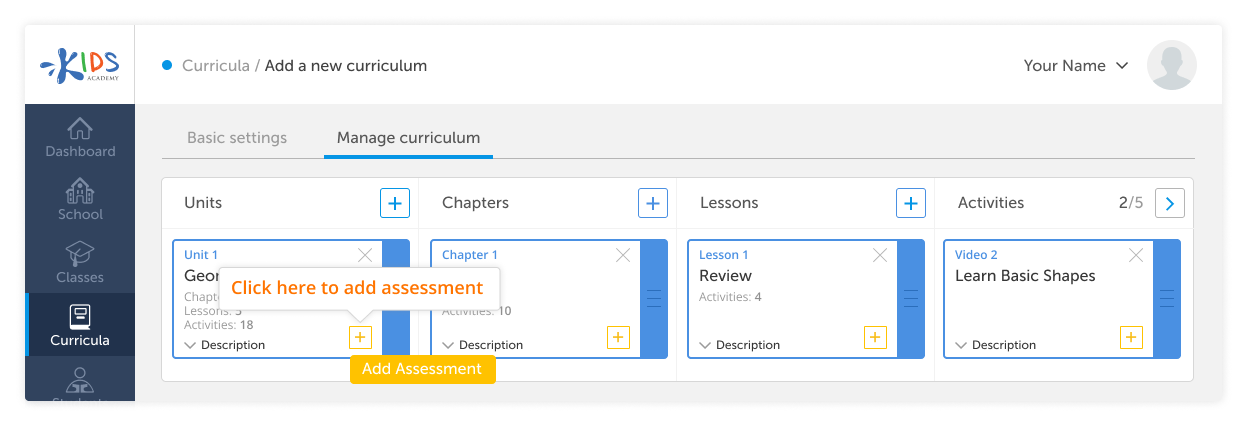
Students will be offered to go through the assessment upon completing the Unit, Chapter or Lesson that you assigned it to.
How to edit an assessment
In the Curricula section follow these steps:
1 Choose a curriculum from the list.
2 Go to the Manage Curriculum tab and choose the unit, for which you want to change the assessment.
3 Click the 
4 Add or delete the activity for the assessment. Click Save.
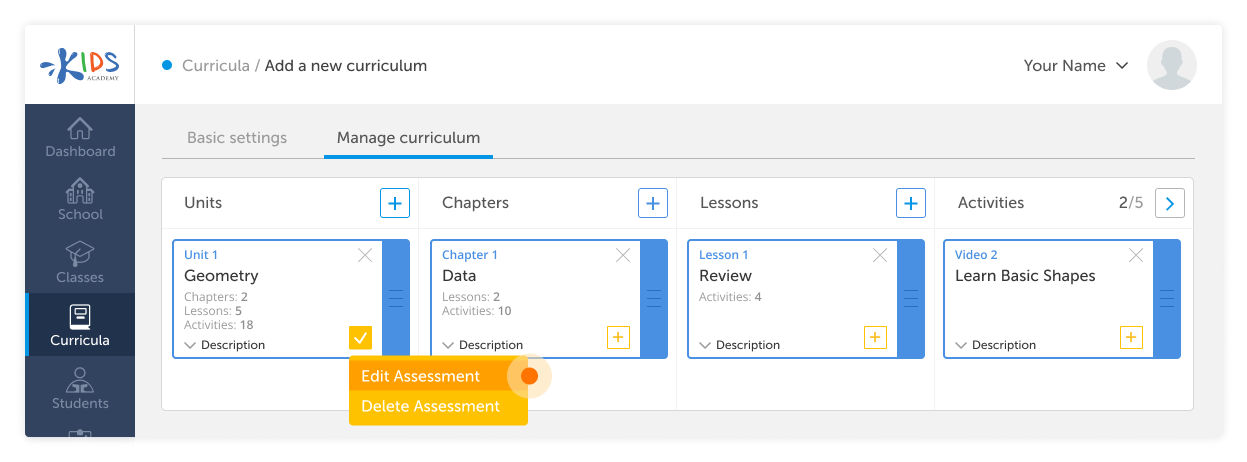
You can add as many activities for the assessment as you wish while adding or editing this assessment. In this step, you can also save activities in your Favorites for later use. (See ‘How to add activities to Favorites’).
How to remove an assessment
In the Curricula section follow these steps:
1 Choose a curriculum from the list.
2 Go to the Manage Curriculum tab.
3 Click the 
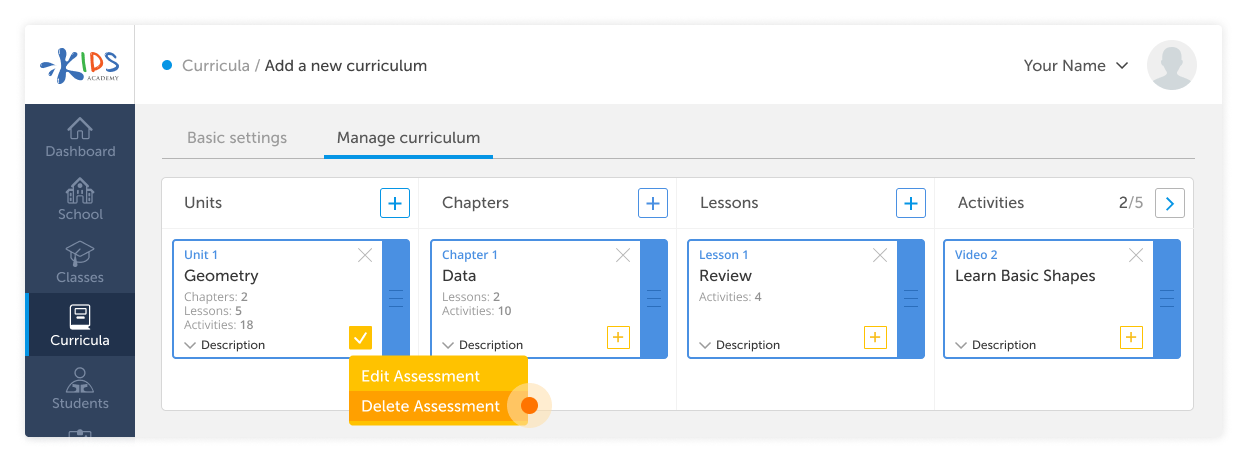
Note: Once you have removed the assessment, you cannot restore it. Removing an assessment will change the number of the assessments in the Dashboard section and the average score for the assessments in the Reports section.
How to add a final assessment
In the Curricula section follow these steps:
1 Choose a curriculum from the list.
2 In the Basic settings click Add Final Assessment.
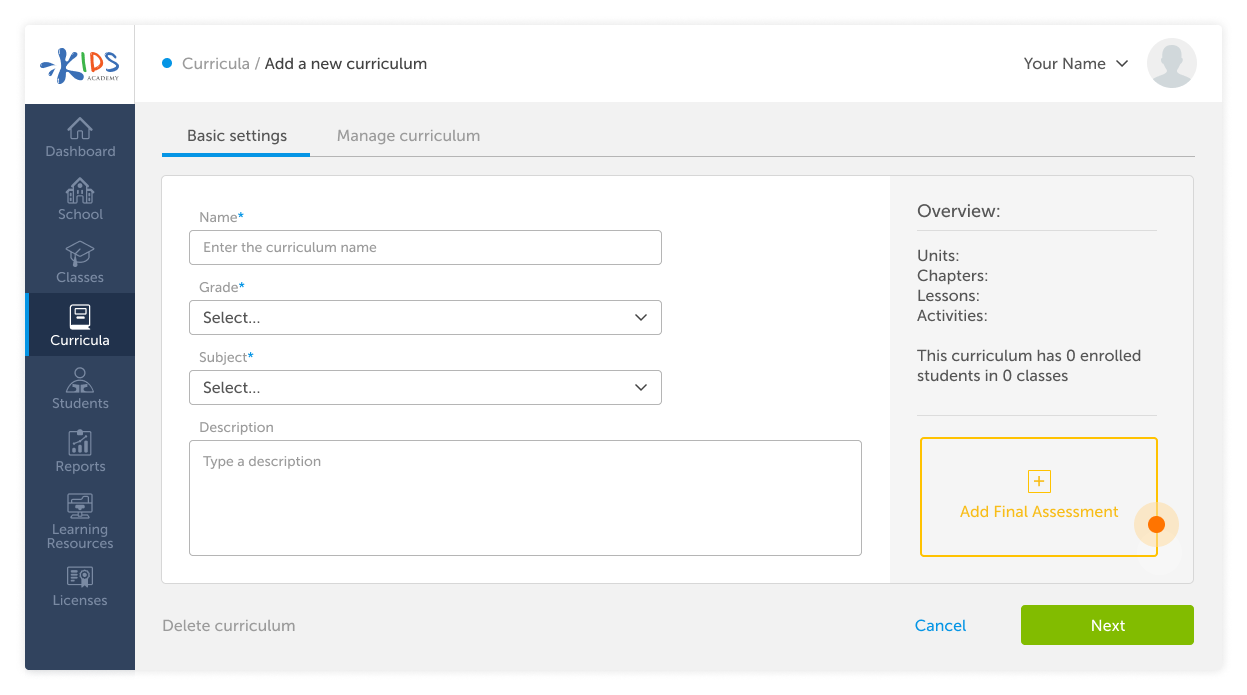
3 Choose the worksheets for the assessment and click Assign. You can choose several activities for the assessment.
4 Click Save.
Students will be offered to do the Final Assessment upon completion of the class course.
Learning Resources section overview
Share articleIn the Learning Resources section, you can find all the activities and tasks for your lessons.
We have different types of learning resources here. The activities are divided into three major types Worksheets, Games, and Videos. All of them are aligned with the Common Core Standards. A team of certified US teachers with years of classroom experience rigorously revise and monitor all the content available in the app.
There is also a search engine that allows you to search for activities by name or standard, and a handy filter to the learning resources by grade and subject.
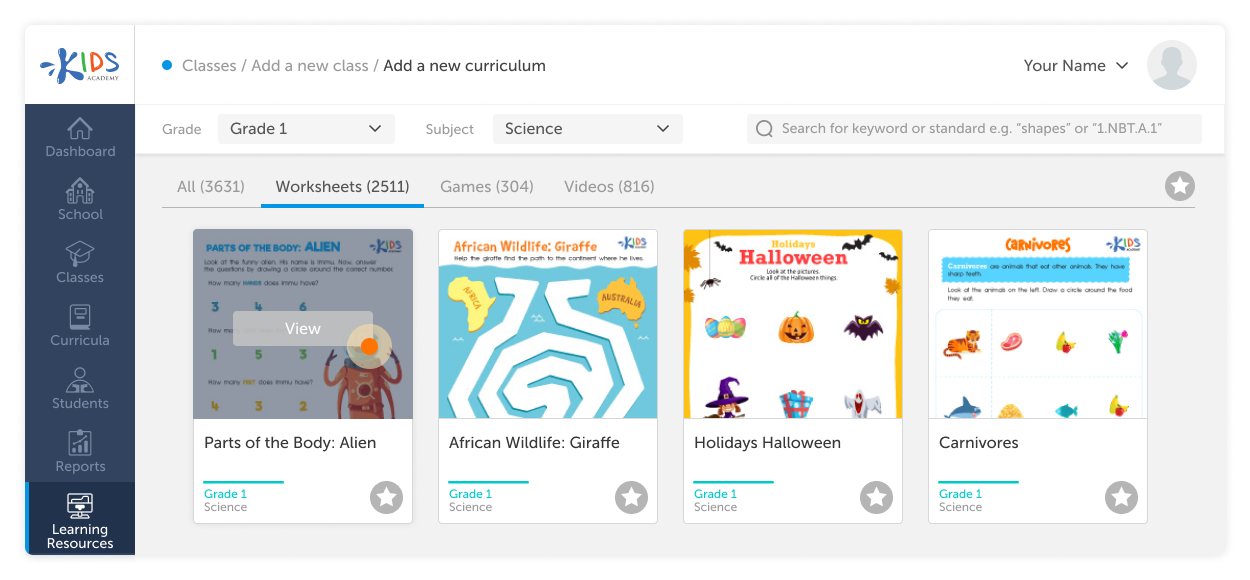
Working with Learning Resources
In the Learning Resources section follow these steps:
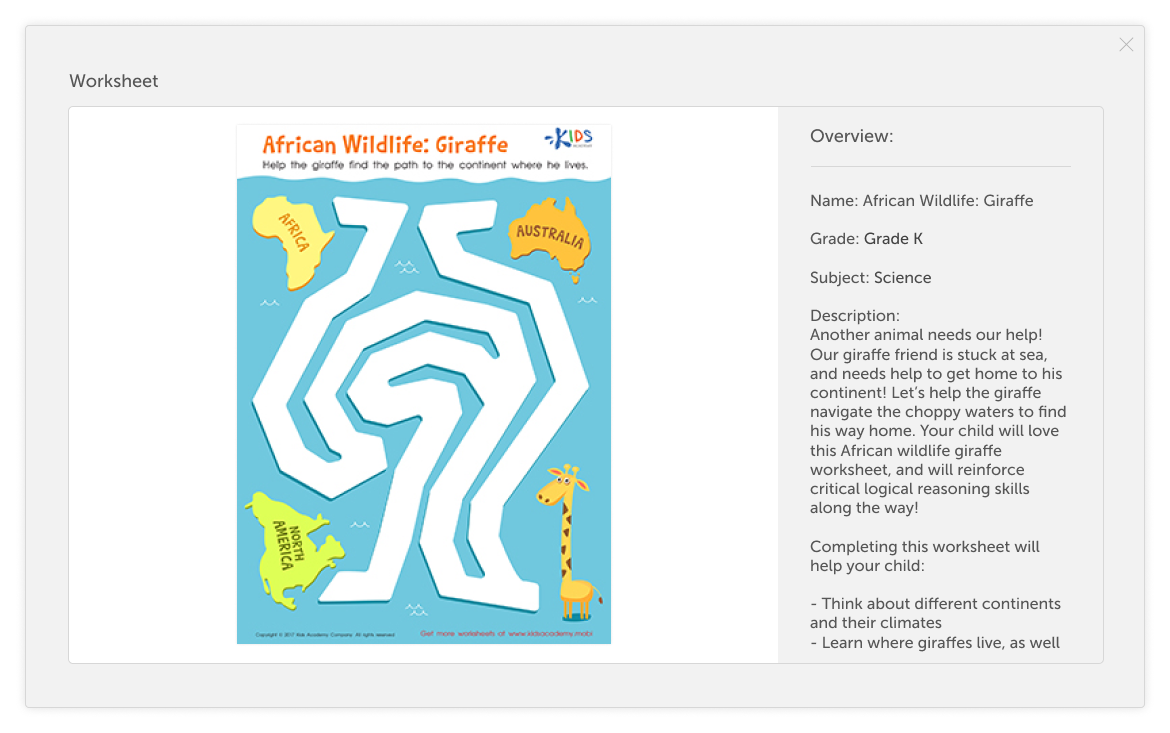
1 Choose the activity and click View. Here you see the grade, the subject and the description of the activity.
How to add activities to Favorites
In the Learning Resources section follow these steps:
1 Click the 
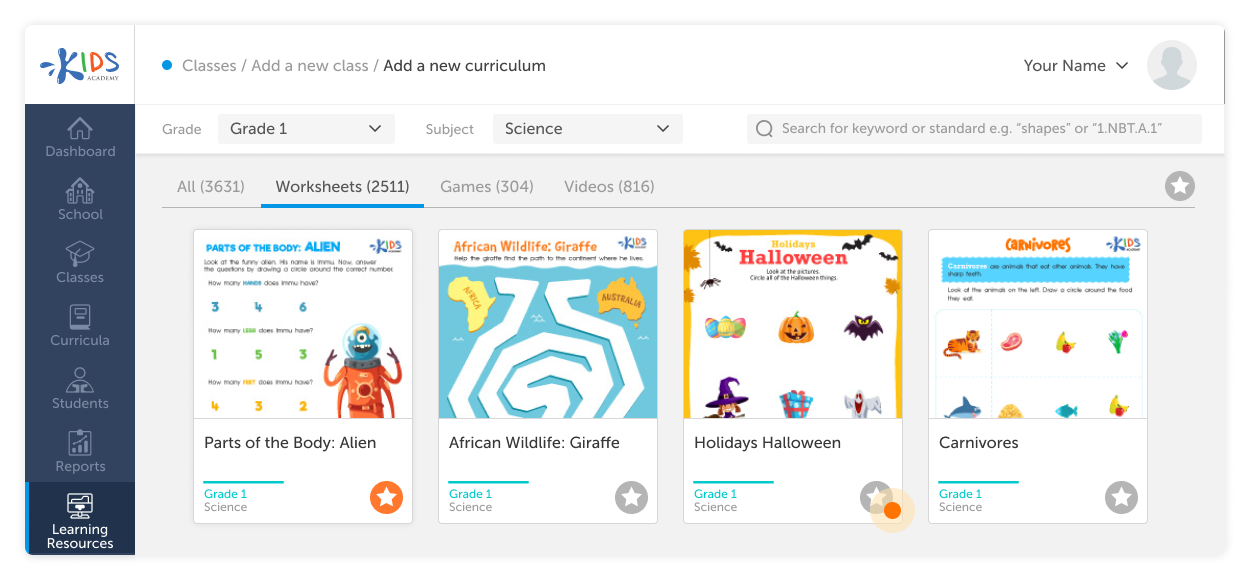
2 To look through your Favorites list click the 
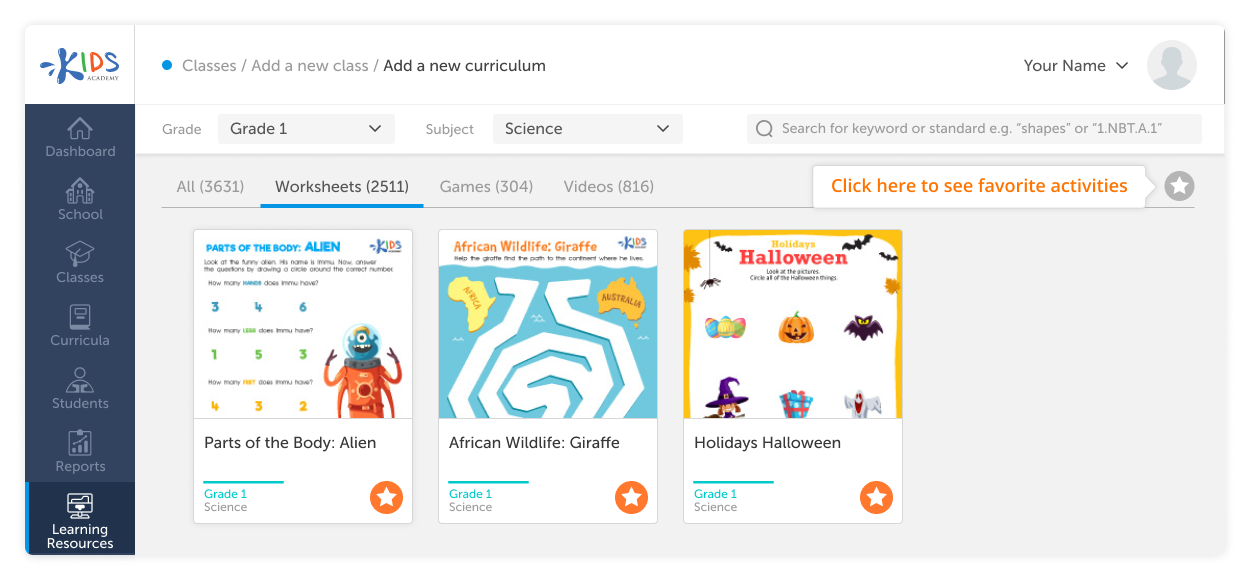
To remove the activity from Favorites click the star icon on the activity again.
Kids Academy Classes section overview
Share articleA Class is a combination of a learning plan or Curriculum and Students assigned to it. E.g., ‘Math Class Grade 1’ can contain all students assigned to study math according to Grade 1 curriculum.
Class = Curriculum + Students.
You can see and manage all of your classes in the Classes section.

There is a handy filter that lets you sort classes by grade or subject and a search bar in the upper right-hand corner.
How to create a new class
Share articleWe create default classes based on all the ready-made curricula that we have in Kids Academy, so teachers only need to enroll students to start using them.
In the Classes section follow these steps:
1 Click + Add New Class.

2 Enter the name and the grade of the class in Basic Settings. The optional description field is for your reference only. Click Next.

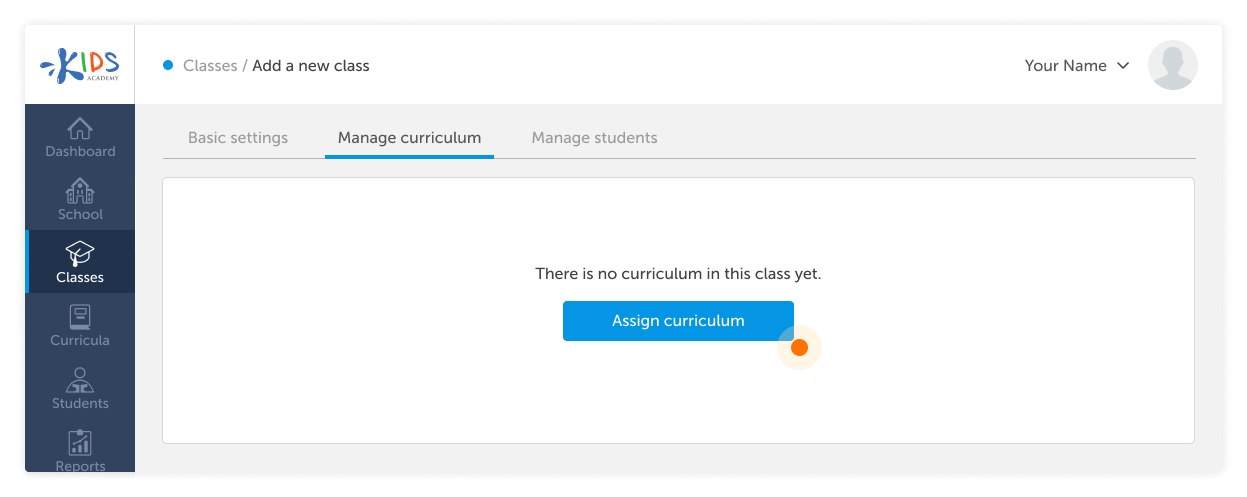
3 Click Assign Existing Curriculum. You can assign just one curriculum to one class at a time.
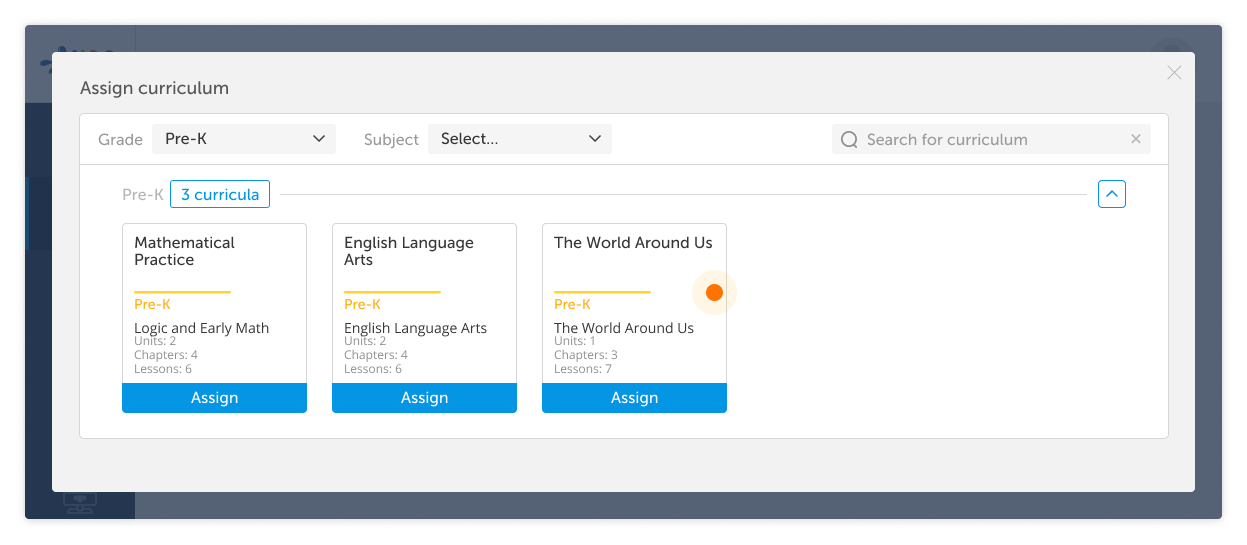
4 Choose one of the existing curricula, and click Assign (if you want to create a custom learning plan from scratch see ‘How to create a new curriculum’).
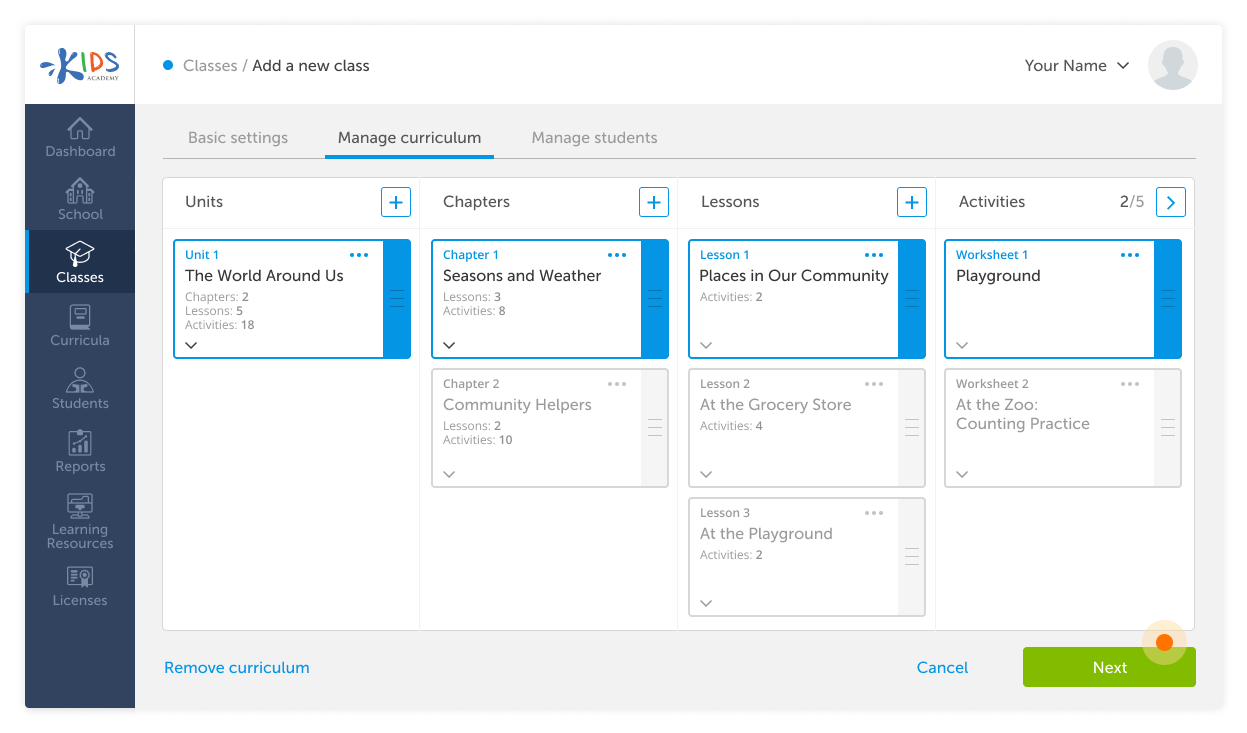
5 In this step, you can preview your curriculum and edit it if you want to change something (please note that the changes you make will affect all classes with this curriculum see ‘How to create a new curriculum’ for details).
If everything is fine, just click Next. The curriculum is assigned to the class.
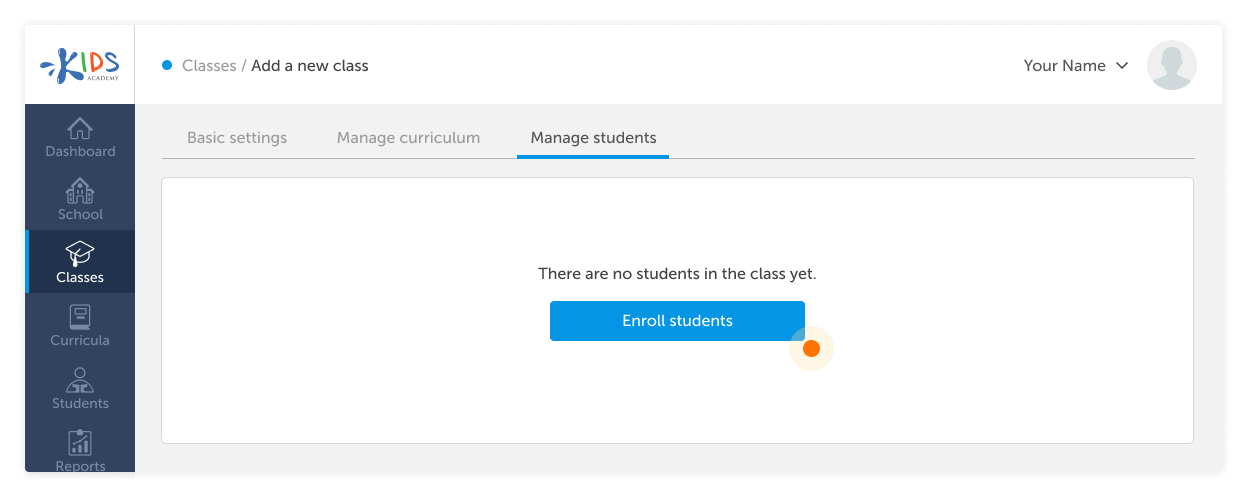
6 Click Enroll Students button
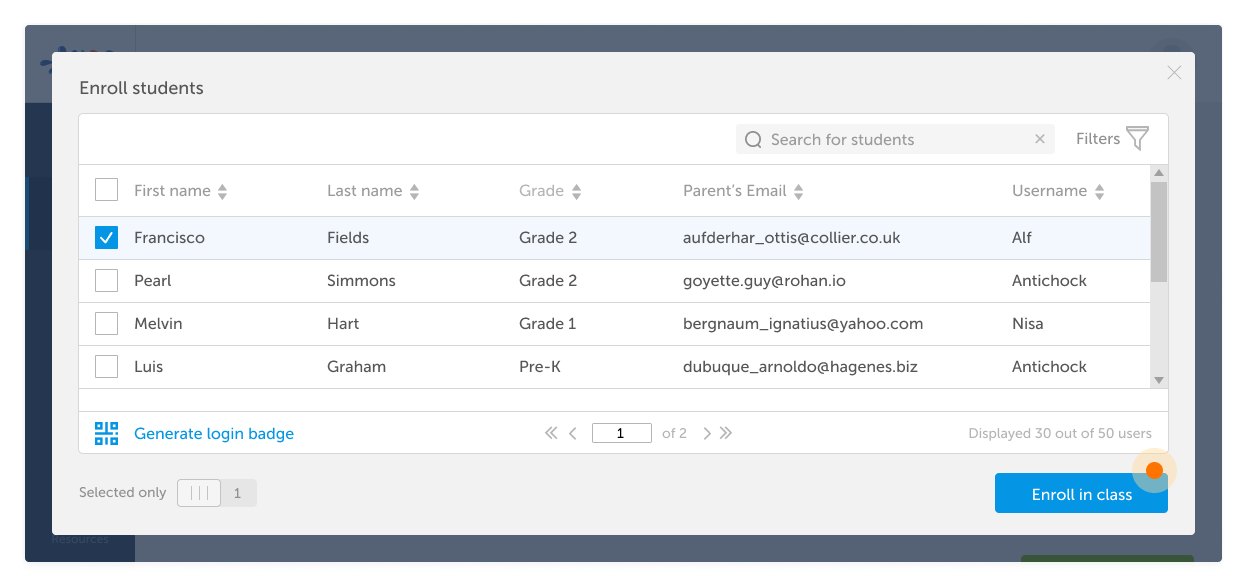
7 Tick the students you want to assign to the class and click Enroll in Class.
8 Click Save. You will see the class appear in the list of classes.
How to delete a class in Kids Academy
Share articleIn the Classes section follow these steps:
1 Choose the class in the Classes section
2 Click Delete Class in the bottom left corner.
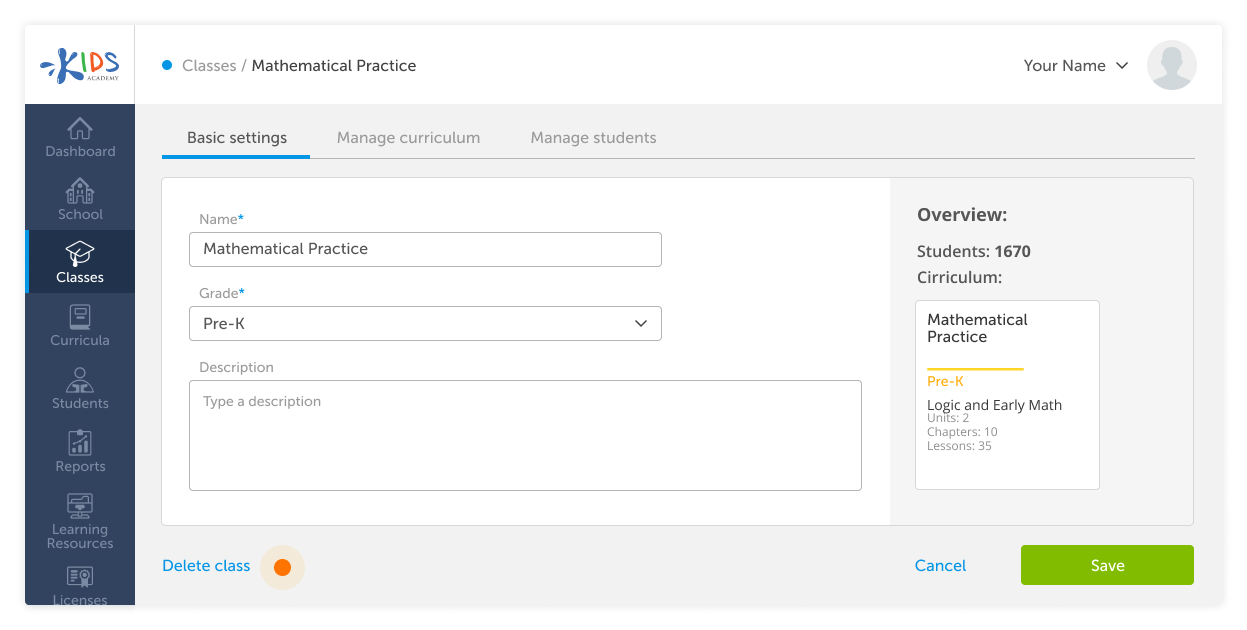
3 Confirm the action.
Note: Remember that once you’ve deleted a class, there is no option to restore it.
How to add and manage students
Share articleNote: Kids Academy learning platform does not support Clever SSO and sync rostering starting June 22, 2022.
In the Students section, you can see the list of your students (note: Admins will see all the students in the school/district account, Teachers will only see the student accounts associated with them). You can search for a student by typing their name or sort them by grades or status (Active/Inactive*).
* Inactive students can’t use the apps and are not counted towards your license limits but you can see their historic reports. They can be activated at any point.
How to add students
There are 2 ways to create Student accounts in Kids Academy.
1 Create and upload a CSV list with the following column headers: First Name, Last Name, Grade, Parent email (optional), Notes (optional).
If you have a .csv list of students, please, contact us via info@kidsacademy.mobi and we will help you to upload it.
2 You can add new students manually.
In the Students section follow these steps:
1 Click +Add a New Student.
2 Fill out the student’s profile (required fields are marked with an asterisk *).
3 Click on the silhouette to upload a photo.
4 Click Save when the profile is ready.
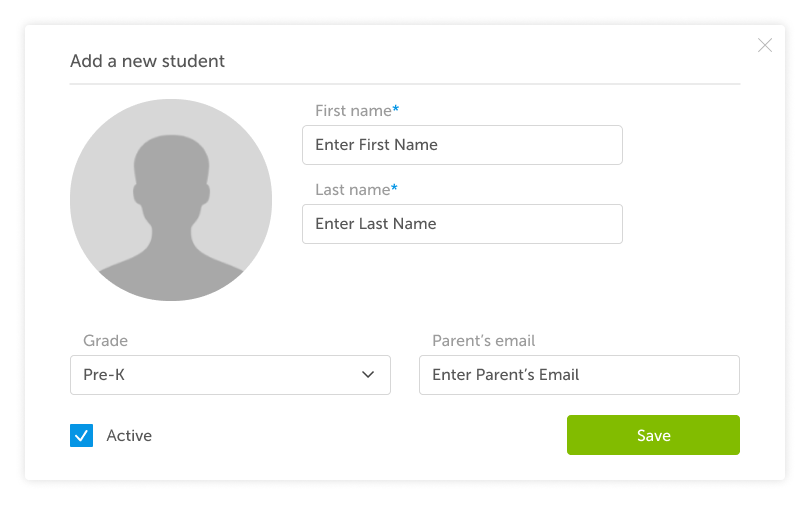
Note: Parent’s email and notes are for your reference only and will not be visible to students.
How to edit a student’s profile
In the Students section follow these steps:
1 Click the 
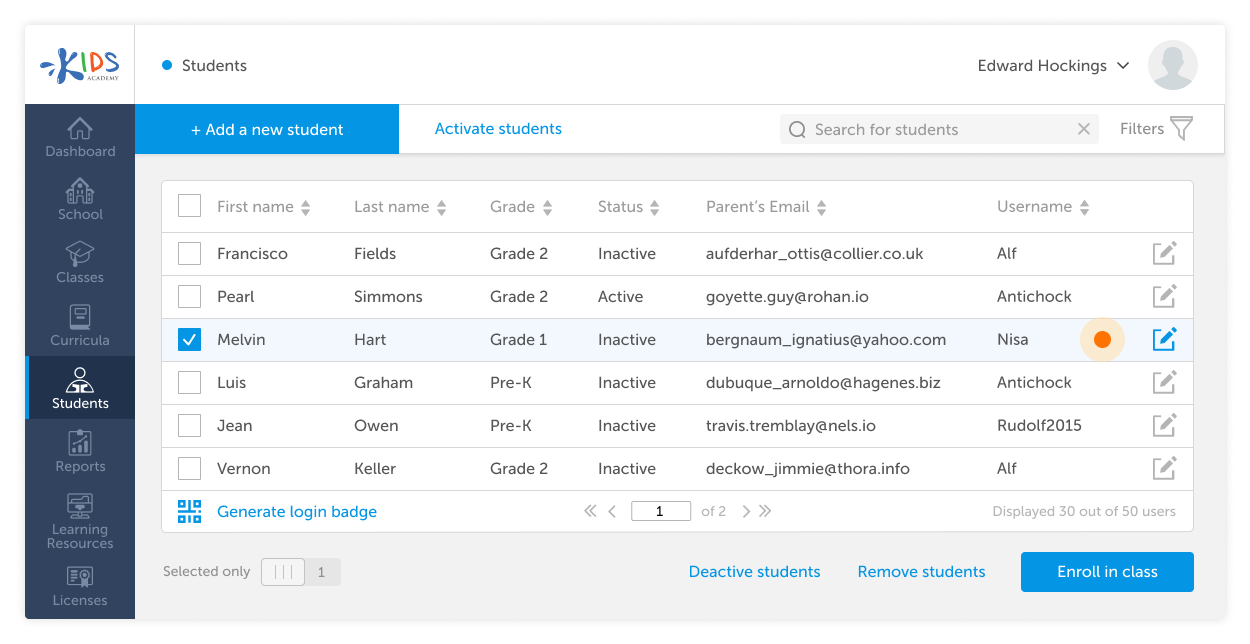
2 Click Save.
How to remove a student
In the Students section follow these steps:
1 Tick the students you would like to remove.
2 Click Remove students in the bottom right corner.
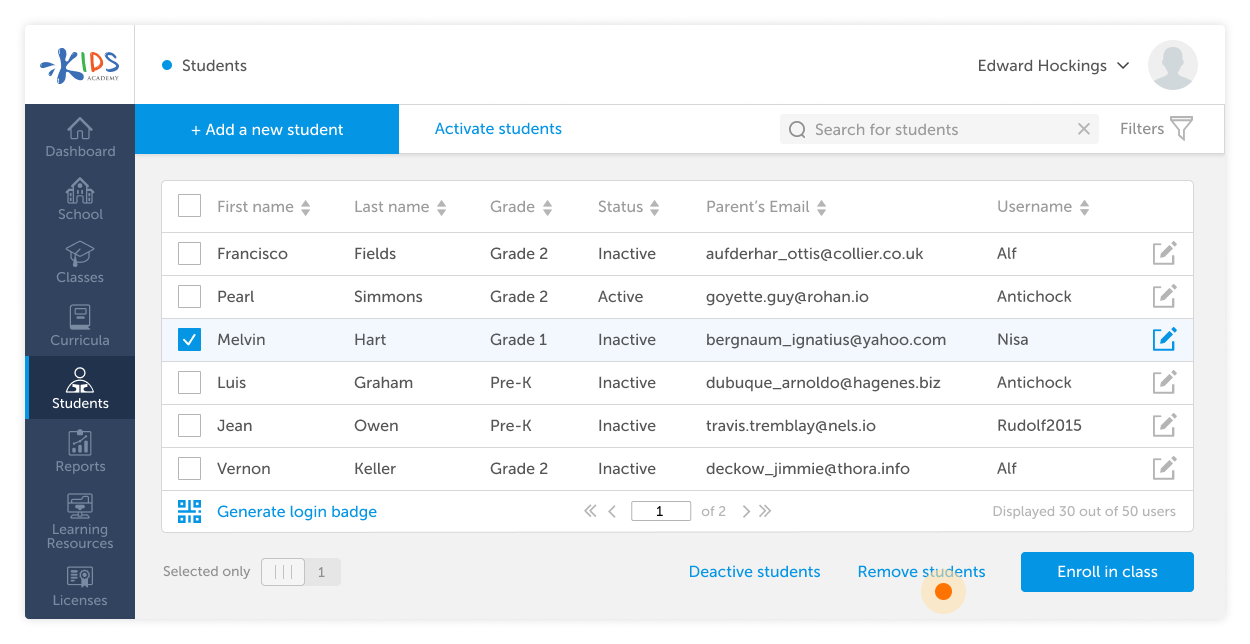
3 Confirm the removal.
Note: Once you have deleted a student, you removed them from the system forever. It will also remove all stats for the student from the Reports section. If you want to temporarily suspend a student’s profile - deactivate it instead.
How to remove a student from a class
In the Classes section follow these steps:
1 Choose a class from the list.
2 Go to the Manage Students tab.
3 Tick the students you would like to remove from the class.
4 Click Remove Students in the bottom right corner.
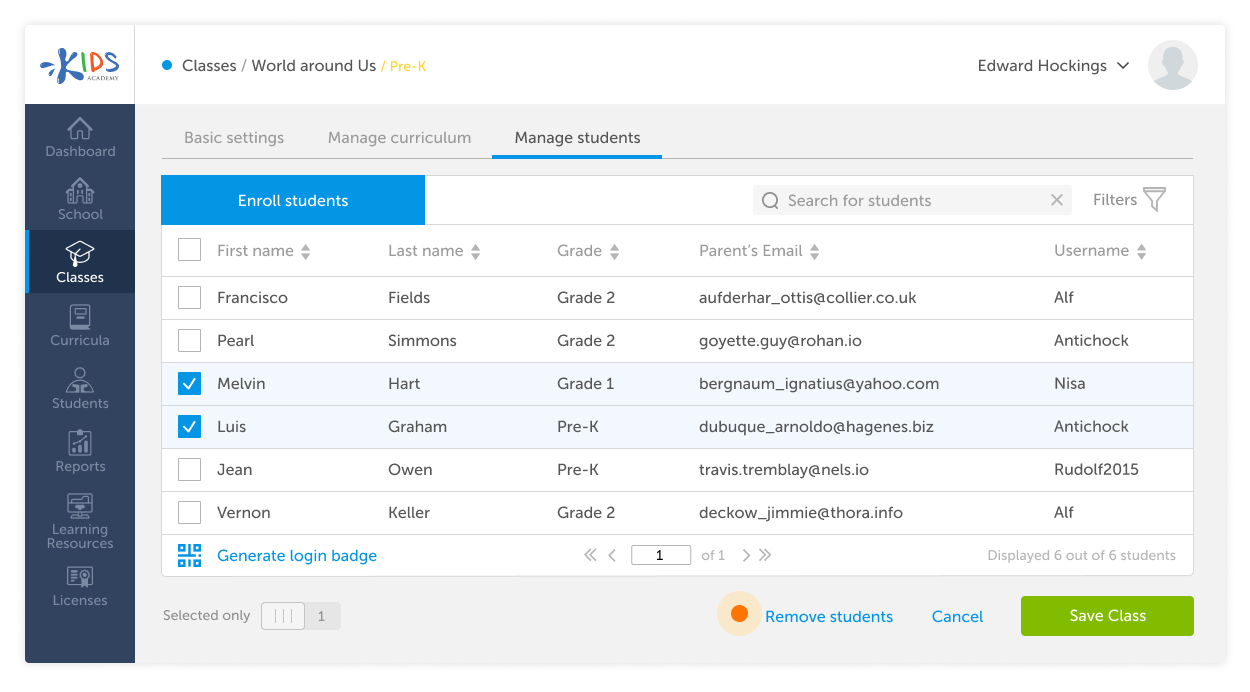
5 Confirm the removal.
Note: The student has been removed from the class, but they will stay in our system. The data on these students will be changed in Reports.
You can add them to the class again. For that, see ‘How to enroll students in a class’.
How to deactivate a student in the system
Inactive students can’t use the apps and are not counted towards your license limits but you can see their historic reports. Students can be activated or deactivated at any point by Admin users.
In the Students section follow these steps:
1 Tick the students you would like to deactivate.
2 Click Deactivate students in the bottom right corner.
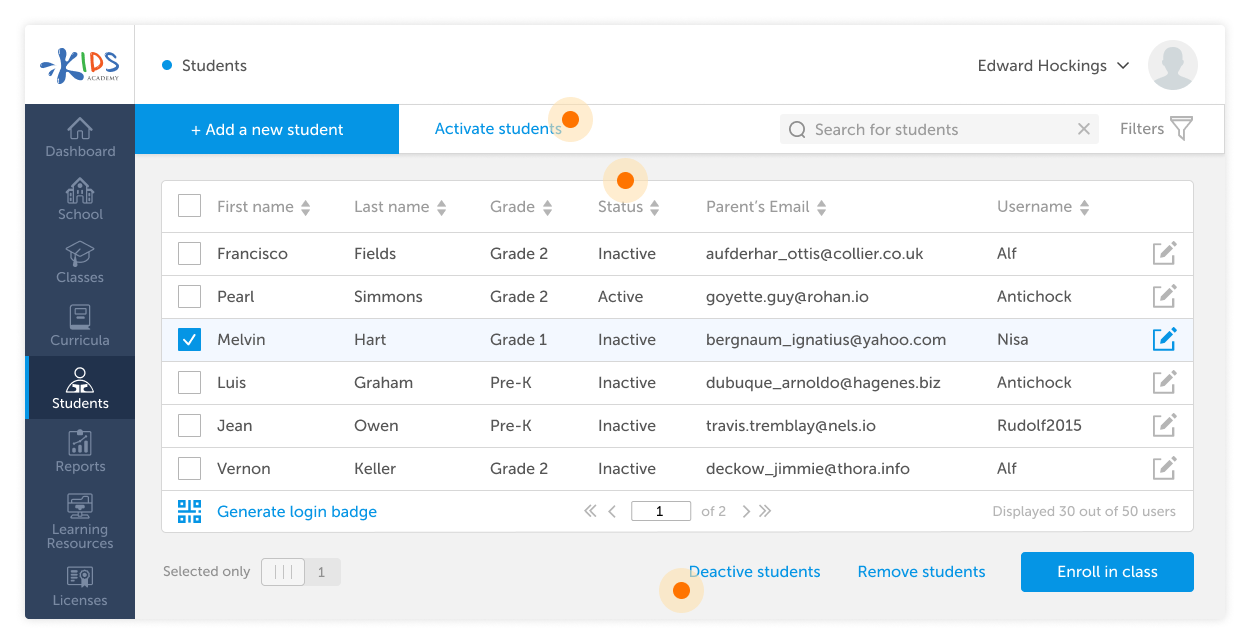
You are not charged for deactivated students and they are not counted towards your license limit.
How to activate a student
In the Students section follow these steps:
1 Tick the students you would like to activate.
2 Click Activate students.
Note: Student’s status will be updated in the Status column. An active student will be able to log into Kids Academy mobile application at any time.
Kids Academy Login Badges
Share articleNote: Kids Academy learning platform does not support Clever SSO and sync rostering starting June 22, 2022.
Kids Academy login badges offer a quick and easy way for students and teachers to log into Kids Academy mobile apps. Students don’t need to remember any logins or passwords - they can simply scan a badge and get straight to their account.
To log in with a badge tap on the Badge Login button in the app and put the badge in front of the device camera.
How to generate login badges for students
In the Students section follow these steps:
1 Tick one or more students you would like to generate login badges for.
2 Click Generate login badge in the bottom left corner.
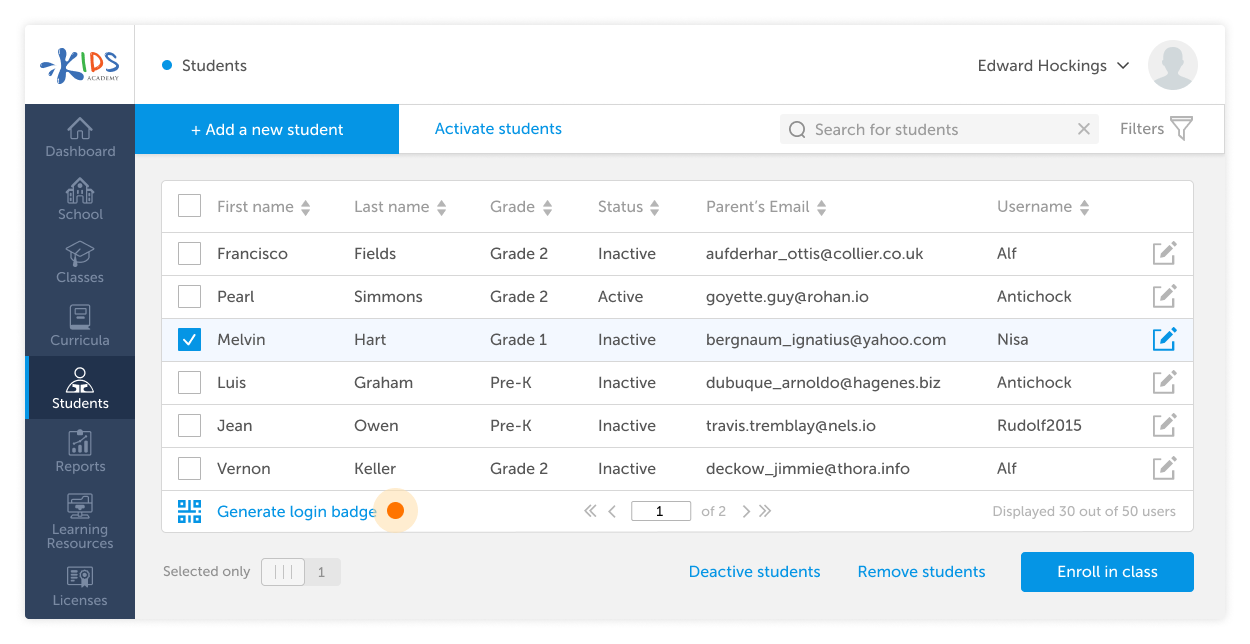
3 The login badge will be downloaded to your computer. You can print them out and give to your students.
How to generate login badges for teachers
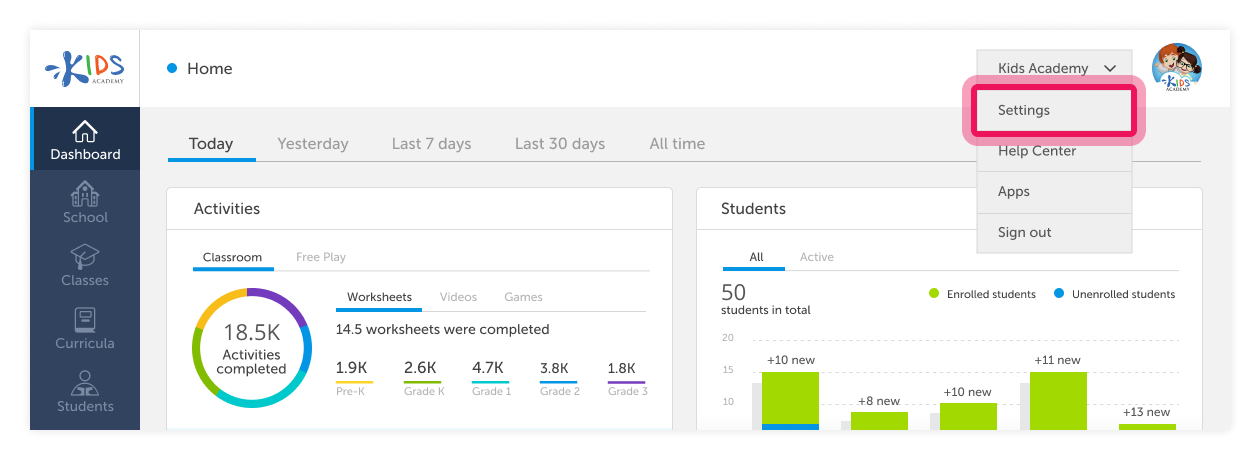
Teachers can log in to the apps with the same email/password combination as on the website. But for convenience, they might want to use Kids Academy login badges as well. To generate a teacher’s badge, go to your account settings and press Generate login badge.
Kids Academy user login and password
Share articleKids Academy login ID cards offer a quick and easy way for students to log into Kids Academy mobile apps.
How to generate user login and password for students
In the Students section follow these steps:
1 Tick one or more students you would like to generate login ID cards for.
2 Click Generate login ID card in the bottom left corner.
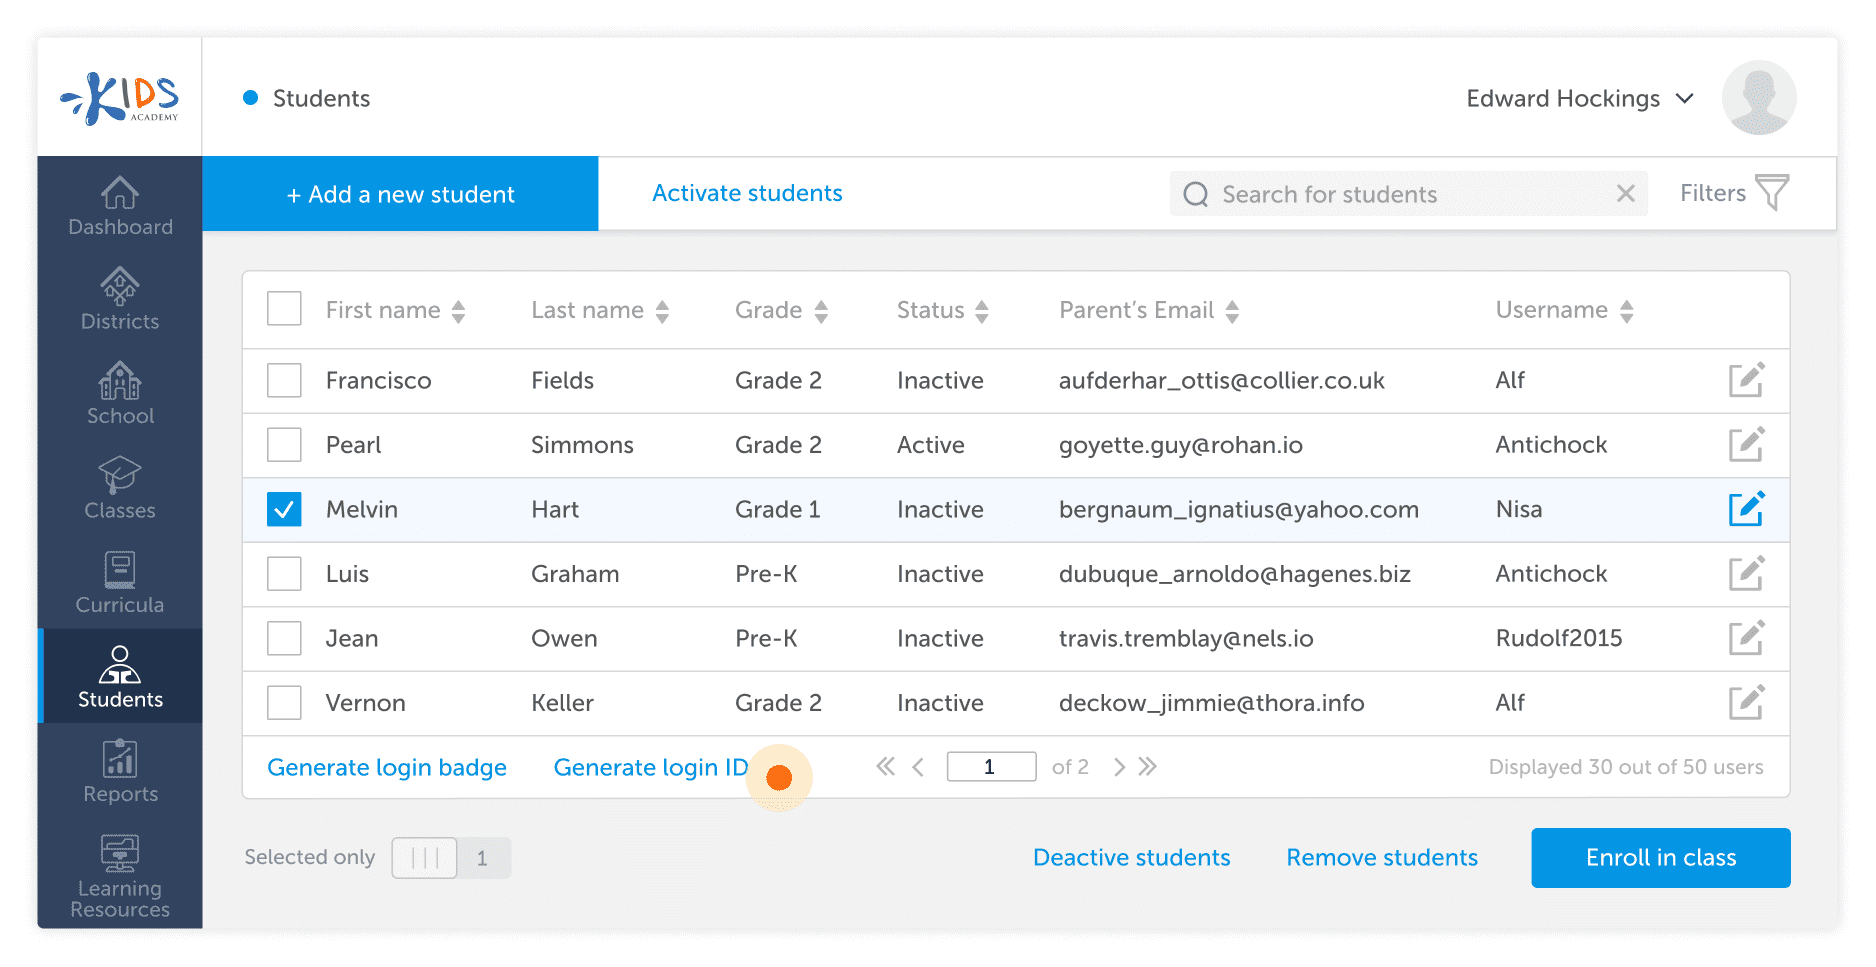
3 The login ID card in CSV. file will be downloaded to your computer. You can use the student's name and password to login your students on their devices or you can copy them and send to a student or parent via email.
How to enroll students in a class
Share articleIn the Students section follow these steps:
1 Tick the students you would like to enroll in the class.
2 Click Enroll in Class.
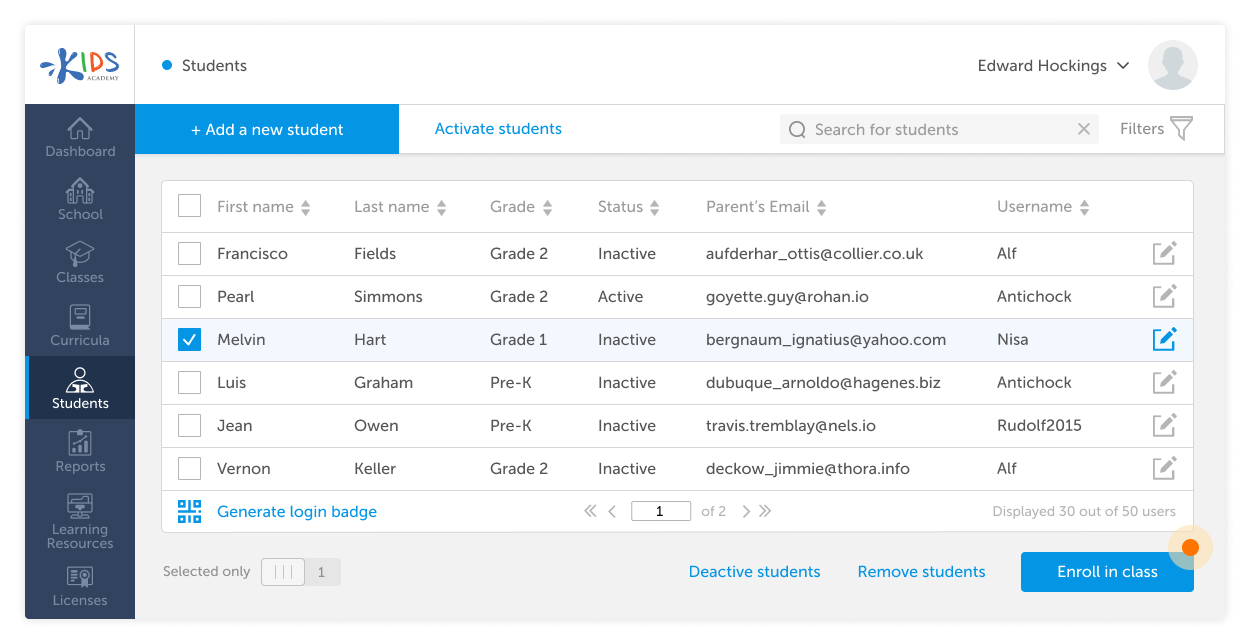
3 Choose the class you’d like students to enroll from the list of the available classes and click Enroll.
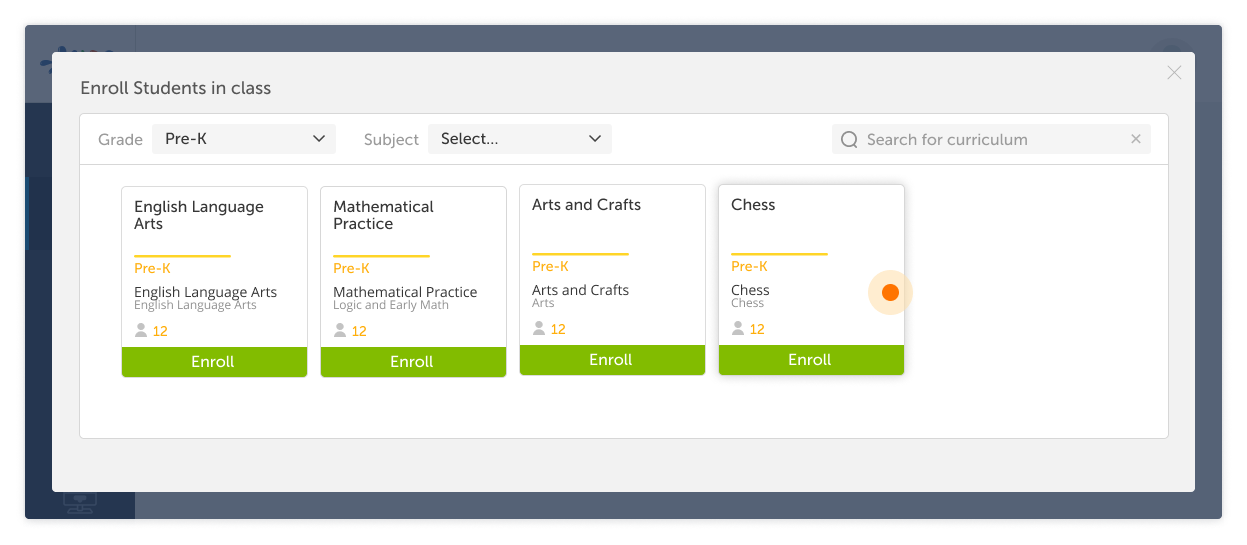
Now, the students are enrolled in the class.
You can also add students to the current class in the Classes section.
In the Classes section follow these steps:
1 Choose a class from the list.
2 Go to the Manage Students tab.
3 Click Enroll students and tick the students you’d like to add to the class.
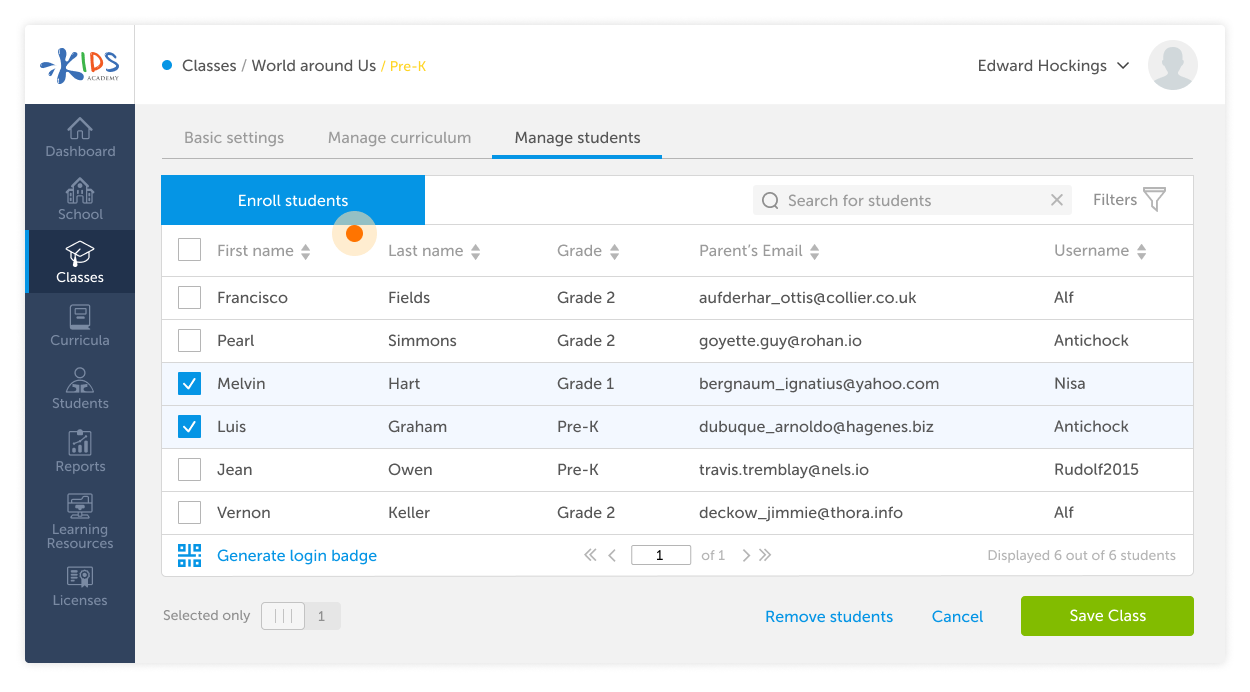
4 Click Enroll in Class. The students will appear on the list of enrolled students.
How to set up an account
Share article1 You can sign up for Kids Academy account here. Then log in to your Kids Academy account here.
Note: You can invite your school or district colleagues by clicking Add new user in the Manage Users tab of the School section.
How to reset password
Share articleIf you forgot your password, use this link and follow the instructions.
Roles
Share articleRoles are sets of permissions that are granted to your account upon its creation and define your experience when using Kids Academy. There are 4 major roles that can be assigned to your account:
District Administrator is a super-user role. District admin in their accounts can add and manage district admins, schools and school admins, teachers, and students.
School Administrator is a role that allows admins in their school account to add both teachers and students and to manage them.
School Teacher is a role that allows teachers in their accounts to manage students, create and modify classes and curricula, view reports and learning materials.
Student is a role that is assigned to children and allows access only to the application.
Visibility to each other:
District account:
- Any district admin sees all schools, teachers, and students who belong to this district.
School account:
- Any school admin sees teachers and students who belong to their school only. They don't see other schools, teachers, and students.
Teacher account:
-Teachers within one school see all students enrolled in this school. To enroll students in Classes, teachers select their students from the whole school list.
Student account:
-Student doesn’t see other students enrolled in the same class.
Working with Classes and Curricula
Classes and Curricula sections are available in all types of accounts.
If a district admin, school admin, or teacher creates new classes or curricula, these changes are only visible in their accounts.
For example, if a district admin creates a new class or customizes a predefined one, these changes won’t affect the Classes section in the accounts of school admins or teachers.
Working with Students
We recommend that only teachers enroll students in Classes in their teacher accounts, not district or school admins unless admins also have students and teach them. If a school teacher in their teacher account enrolls a student in a class, it won’t be visible in the Classes section in district or school accounts.
Importing students from Google Classroom
Share articleHead over here, then click Log in with Google and enter your Google username and password.

If your students aren’t already enrolled in an existing Google Classroom section, you can import them from your rosters to your Kids Academy account:
1Navigate to the Students section to get started. Once there, click on Import from Classroom to select students from your Google rosters;

2From there, select the Google account that is associated with Google Classroom;
3Select the class to import students from;
4Finally, select the grade level you would like your imported students to be classified and click Next.

Importing Classes from Google Classroom
Share articleIf your students have already been enrolled in a Google Classroom section, you can import entire classes at once:
1Navigate to the Classes section to select whole classes to import to your account;

2Select the Google account associated with Google Classroom;
3Select the class you would like to import into your Kids Academy account. Then, select the grade level you would like your imported class to be classified.

Note: once classes are successfully imported, you can easily find them in the Classes section here and in the app. Students from the imported Google Class also will be added to Kids Academy student list in the Students section.
Making assignments via Google Classroom
Share articleTeachers can now share a single activity from the Kids Academy Learning Resources section via Google Classroom. To assign a single activity, students must be enrolled in a class where that lesson is covered.
To share a single activity, navigate to the Learning Resources section. Select an activity and click View.

There are two options to choose from:
-Share via Google Classroom. The activity will be shared with a particular class you select in your Google Classroom. This option will notify your students of new assignments through Google Classroom and gives a pathway for completing them.
-Copy a link. This option will give you a direct link to share with students.

1To share the selected activity with a particular class in your Google Classroom, click the Classroom icon, then select the Class.


